
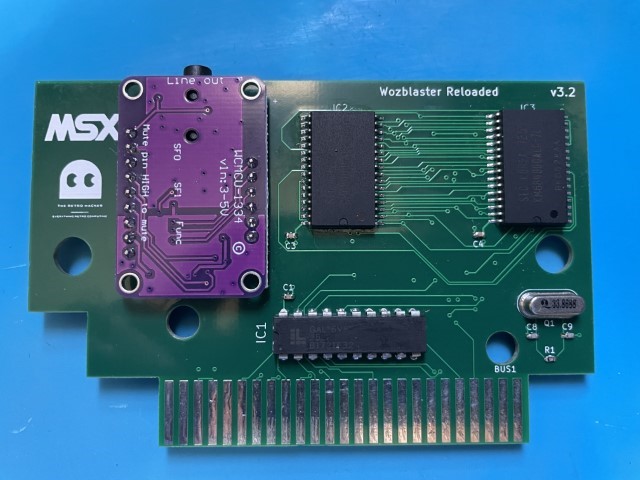
This is an article to document the steps to build the Wozblaster Reloaded v3.3. This version was created to use modern components as well as a specific DAC module that is well known by the Arduino and ESP32 communities.
The Adafruit A1334 module in question is a high-quality Digital-to-Analog Converter (DAC), designed to enhance the audio output capabilities of your projects. The A1334 module stands out due to its excellent signal-to-noise ratio and low total harmonic distortion, making it an ideal choice for a device like the MSX Wozblaster Reloaded cartridge.

In this guide, we’ll detail the process of integrating the Adafruit A1334 module into your Wozblaster Reloaded v3.3 build, providing step-by-step instructions to help ensure a smooth and successful assembly process. Whether you’re a seasoned electronics hobbyist or new to the world of DIY audio, this guide will give you the knowledge and confidence to enhance your MSX audio experience. So let’s dive in!
Bill of Materials
Here is a table with everything you need to build your own cartridge. You can download all gerber files required to build the PCB using JLCPCB or PCBWay services from the project GitHub here cristianoag/wozblaster: Repository to host source files for the Wozblaster Reloaded (github.com)
| Reference | Value | Description | Qty | Link |
| C1, C3, C4, C6, C7, C10, C11, C13 | 0.1 uF/100 nF | 0603 100NF Ceramic Capacitor (104) | 8 | Ali Express |
| C2, C14 | 10uF/10v | Tantalum Capacitor SMD Case A 10V 10UF | 2 | Ali Express |
| C8, C9 | 12 pF | 0603 12pF Ceramic Capacitor (120) | 2 | Ali Express |
| R1 | 3.3K Ohms | 0603 3.3KR Resistor | 1 | Ali Express |
| R3 | 1K Ohms | 0603 1K R Resistor | 1 | Ali Express |
| U2 | UDA1334MOD | DAC Module 1334 UDA1334A I2S DAC Audio Stereo Decoder Module Board For Arduino 3.3V – 5V DAC | 1 | Ali Express |
| IC2, IC3 | KM684000ALG | 512Kx8 bit Low Power CMOS Static RAM | 2 | Ali Express |
| IC1 | GAL16V8D | High Performance E2 CMOS PLD Generic Array Logic | 1 | Ali Express |
| IC5 | YMF278B-F | Yamaha FM + WAVETABLE SYNTHESIZER | 1 | Drop me a message to check stock |
| IC6 | AM29F016B-120EC | 16 Megabit (2M x 8-Bit) CMOS 5.0 Volt-only, Uniform Sector Flash Memory | 1 | Ali Express |
| Q1 | 33.8688 Mhz | 33.8688M 33.8688MHZ 20PF QUARTZ CRYSTAL RESONATOR HC-49S | 1 | Ali Express |
| BOX | PATOLA-MSX | Patola Black MSX Cartridge | 1 | Mercado Livre |
To simplify the soldering process you can use the interactive BOM located here to guide you trough the process to separate and solder the components on the PCB.
I also published a video on YouTube describing the whole process to build the cartridge.


Programming the GAL16V8D
The GAL16V8D is a programmable logic device (PLD) that can be programmed to perform various logical functions and can be used to implement a variety of digital circuits.
It is used to implement the selection logic on the Wozblaster.
You need to use an TL866 programmer to program the GAL16V8D chip. The TL866 is a universal programmer that is capable of programming a wide variety of devices, including PLDs like the GAL16V8D.
On the project repository you can find the GAL16V8D.jed file that is required to program the chip. Follow the steps below to program:
- Connect your TL866 to your PC, insert the GAL16V8D chip in the programmer ZIF socket and execute the Xgpro app.
- Click the Select IC button and search for GAL16V8D. Click Select.

- Click load and select the GAL16V8D.jed for the Wozblaster.
- Click PROG.
- Uncheck the lock bit option and click Program.

- Wait until the chip gets programmed.

Programming the AM29F016B
The TL866 cannot be used the AM29F016B directly. You need a specific adapter to program the flash in parts or use a programmer that is capable to program memories with 48 pins. The AM29F016B is a TSOP-48 SMD chip.

To program the flash I used my SuperPro 610P programmer. But you can use the newer XGecu Black T48 TL866-3G programmers available on Ali Express. With a TSOP-48 to DIP-48 adapter, you can easily program the content of the flash from the YRW801-M – Yamaha – 1993.rom file available on the project GitHub.

Here are the steps to program the flash using the SuperPro 610P:
- Connect the programmer to the PC and execute the SuperPro 610P programmer software.
- Click Device and search for AM29F016B. Click OK.

- Insert the flash on the adapter, and the adapter to the ZIF Socket and lock it.
- Click Load file and select the YRW801-M – Yamaha – 1993.rom file. Click OK.

- Click Blank check to ensure you have a blank flash.
- If you receive a message saying Blank_Check OK, then move forward with the programming process. Otherwise, click Erase to erase the memory and wait until it gets erased.
- Click Program to start the programming process. After a few seconds you should receive a message saying Program OK!.

Troubleshooting
Noise on the main output
Noise on the main audio jack can have multiple causes. From a faulty Adafruit A1334 module to issues with the RAM chips or with the flash used to store the MIDI samples. The strategy to troubleshoot depends on which stage you are on the build process.
One of the reasons I recommend soldering the module as the last piece on the board is to check if you have a faulty module. If you don’t solder it, you can replace the module you have on the board by a new one and check if the noise goes away.
But more common causes to noise on the main audio output are more related to issues with one of the memories (RAM or Flash).
Here you see an example of a faulty cartridge with noise on the output. When running the moontest.com tool we can see that one of the memory banks is faulty, thus causing issues when the YMF278 tries to copy samples over the RAM to use with tracks.

On the board, Bank1 is the memory located closer to the board of the PCB. You will need to use hot air to de-solder the chip and replace it by a new one.

The moontest tool can be downloaded from Alex Wierzbowsky github repo at Wierzbowsky/MoonTest: Wozblaster/Moonsound card on-board RAM tester (github.com)
References
- Blasting Sound for your MSX – The Wozblaster (Reloaded) – The Retro Hacker
- cristianoag/wozblaster: Repository to host source files for the Wozblaster Reloaded (github.com)
- Montando o Wozblaster Reloaded – YouTube
Hi,
Can I buy from you one YMF278B-F chip?
I’ll send you an e-mail with details.
Hello ! Cool project, I am also interested in 1-2 YMF278B-F chips. Thanks !
Hi Marcel, I sent you a private message. I still have some units available.
Can I buy one YMF278B-F chip?
Hi Takashi, I’m running out of OPL4 chips at this moment. Sorry.
That is unfortunate. Please email me when the inventory is back in stock.
Is there a chip that can replace YMF278?
I’m aware of a chip that consolidates the functionalities of both the YMF278 and the YRW801 into a single form factor, although I can’t recall the specific code at the moment. But, locating that chip is even more challenging than finding the YMF278. Rest assured, if I come across more of these chips in the future, I’ll be sure to inform you.