
It is indeed amazing how open source projects can contribute to the retro computing community. The WonderTANG project by Luis Felipe Antoniosi is a great example. The project is a cartridge that uses a Sipeed Tang Nano 20K FPGA development board to implement some really cool features for the MSX line of computers.

The project allows any MSX to run SEGA Master System ROMs as it implements the VDP used by that platform as well offer a selection of other features like a Nextor driver, 4MB of memory mapper, 2MB Mega RAM, SCC+, FM OPLL plus a MSX Music ROM as well as an Master System VDP + PSG to run SMS roms in your MSX.
You can find the project on Luis’s GitHub repo here lfantoniosi/WonderTANG: TangNano 20K cartridge for MSX computers (github.com)
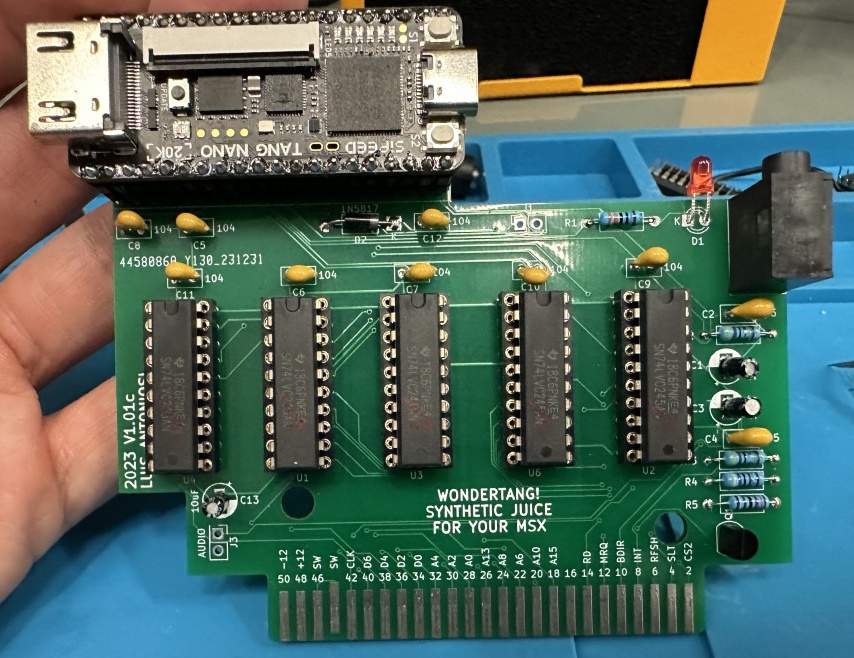
I built one of those boards recently and documented components required, steps to build and program as well as a few tips on how to use the board to run SMS games.
This document is based on the 1.01c version of the board.
Bill of Materials
| Reference | Value | Description | Qty | Link |
| C5, C6, C7, C8, C9, C10, C11, C12 | DIP-100NF | MLCC Monolithic Ceramic Capacitor DIP 100nF (104) | 8 | AliExpress |
| C2, C4 | DIP-1UF | MLCC Monolithic Ceramic Capacitor DIP 1uF (105) | 2 | AliExpress |
| R2, R3 | DIP-47R | Resistor PTH 47R | 2 | AliExpress |
| R1 | DIP-330R | Resistor PTH 330R | 1 | AliExpress |
| R4 | DIP-4.7K | Resistor PTH 4.7KR | 1 | AliExpress |
| R5 | DIP-2.2K | Resistor PTH 2.2KR | 1 | AliExpress |
| D1 | LED-3MM | LED 3MM Red | 1 | AliExpress |
| D2 | 1N5817 | SCHOTTKY BARRIER RECTIFIER DIODE | 1 | AliExpress |
| U1, U2, U3, U4, U6 | SOCKET-DIP-NARROW-20 | DIP Socket Narrow 20 pins | 5 | AliExpress |
| U1, U2, U3, U4, U6 | SN74LVC245AN* | OCTAL BUS TRANSCEIVER WITH 3-STATE OUTPUTS | 5 | Digikey |
| Q1 | 2N3904 | 2N3904 NPN switching Transistor | 1 | AliExpress |
| J2 | SJ1-3533NG | SJ1-3533NG Audio P4 3 Pin connector | 1 | AliExpress |
| C1, C3, C13 | ELEC-DIP-10UF-16V | Electrolytic Capacitor DIP 10uF 16V | 3 | AliExpress |
| J1, J3 | PH-254-S-M-40-BLACK | 2.54mm 1 x 40 Pin Male Single Row Pin Header Strip Black | 1 | AliExpress |
| U5 | GW2AR-DEV | Sipeed Tang Nano 20K Development board | 1 | AliExpress |
| N/A | MICROSD | 4GB Micro SD Card | 1 | AliExpress |
(*) I had major issues with the SN74LVC245AN bought from AliExpress. They look like common LS245 DIP chips just rebranded to SN74LVC245AN and none of the ones I bought worked as expected with the board.
Buiding the Board
The building process is very straightforward, employing only PTH components.
However, keep in mind that utilizing sockets may hinder the board from fitting into a standard Konami case. Additionally, the audio connector has a high profile, preventing the use of a typical case. In fact, the audio jack’s height poses an issue when trying to integrate the board into some MSX computers.

I also opted for female rounded pin headers along with suitable male counterparts to seamlessly connect the Tang Nano to the board. Through my cartridge-building experience, I observed that these connectors provide a superior contact between the Tang board and the cartridge.

Another valuable insight pertains to the power source for your MSX. Ensure a stable 5V (or a value close to that) on the cartridge’s 5V rails. Some MSX computers may deliver less than 5V over time due to the aging power source, impacting the Tang Nano when connected through the cartridge.
Programming the TangNano 20K
Install the Gowin Educative IDE or just the programmer if you want to just flash the files on your board. You can install it from https://www.gowinsemi.com/ by providing your personal data and registering. Please reboot your computer after installing the drivers.
Connect your TangNano board to the computer USB and open the Gowin Programmer software. Please note that we will be just programming the board, so you will not effectively use the IDE at this time. You should see the following message indicating that your board/cable was recognized.

Click Add Device. You will see a new device on the list. Click on the Series and select GW2AR.

Now double click the device on the list and set Access Mode = External Flash Mode, Operation = exFlash Erase, Program thru GAO-Bridge. Click the elipsis and select the WonderTANG.fs file. Select Generic Flash as the Device and make sure the address 0x000000 is selected. Click Save.

Click Add Device again. Set the Series to GW2AR. Double click on the device and set Access Mode = External Flash Mode, select Operation = exFlash C Bin Erase, Program thru GAO-Bridge. Click the elipsis and select the Nextor-2.1.1.WonderTANG.ROM.bin file. Select Generic Flash as the Device and make sure the address 0x100000 is selected. Click Save.

Now Enable just the first device on the list, go to the Edit menu and select Program/Configure (or click the program button).


Repeat the steps now enabling just the second device on the list. That will save the BIOS on the flash.


Using the board
When initializing your MSX system with the cartridge connected for the initial setup, a screen displaying essential information will appear, followed by the execution of MSX BASIC. Notably, the WonderTang cartridge comes equipped with a Nextor driver integrated into its BIOS, thereby extending the capabilities of MSX BASIC with Nextor extensions. To commence the process of creating a compatible microSD card, the first step involves running the _fdisk command to establish a partition that aligns with the system requirements.
Before initiating the MSX system with the cartridge, ensure that a microSD card is properly inserted into the Tang Nano slot. Remember that a 4GB partition on the microSD card is necessary for optimal functionality. Even if your microSD card has a larger capacity, you must define a partition with the specified size of 4GB or less. You have the flexibility to create additional partitions at a later stage, allowing you to mount them with different letters using Nextor tools if desired.


In the screenshots below you can see the selections to create a single 3.8GB partition (the total available size on my microSD card) using the Nextor fdisk tool.


Ensure that you format the card using FAT and copy the necessary NEXTOR.SYS and COMMAND2.COM files to the root directory of the card. Additionally, include folders containing any software you intend to use with the WonderTang. Do not forget to copy the latest version of SofaRun.
Keep in mind that the WonderTang cartridge not only incorporates Sega Master System components but also provides memory expansion, facilitates access to Nextor for loading files from the microSD card, and enables the loading and execution of files through SofaRun or other software.
When utilizing SMS software, note that the video output will be accessible through the HDMI connector on the Tang Nano board. This HDMI output activates only when the SMS VDP is triggered by running an Master System ROM.
If you plan to engage with Sega Master System software, ensure you have either two monitors or a method to switch between your primary screen and the one displaying video from the Tang Nano HDMI connector. This setup is essential for an optimal gaming experience with Sega Master System software.
Running MSX ROMS with the WonderTang SCC
To run MSX games that use the SCC you will need the smram.com tool. You can download it directly from the project Github here. If you run MSX games directly from SofaRun, in general they will not activate and use the Wondertang SCC as SOFARUN doesn’t like when the SCC is available on the same slot used to expand RAM.
To run the ROMS and activate the SCC use: SMRAM.COM /R5 <FILE>.ROM
Please check the documentation available on the project GitHub repository for additional parameters when using SMRAM.COM.
Running SEGA Master System Games
To Run SEGA SMS games you will need the appropriate .sms file containing the game ROM and change the SSMS.INI file that is located on the folder used to install SOFARUN. The INI file needs a few lines for each game that you will execute using SOFARUN and its SSMS companion tool. SOFARUN also has the autopatch feature that can be used, however it may cause glitches in a few games, so it is always better to include the game into SSMS.INI if possible.
Also make sure you use the right ROM files that are listed with the right CRC on the SSMS.INI file. For each SMS game there are multiple ROM versions available on the Internet, some of them are not listed on the file and will not run OK with the default configuration of SSMS.
There is some documentation available on MSX.ORG about that, as the tool was used to execute SMS roms with the old Franky cartridge that was produced long time ago to allow MSX computers to run SMS games.
Here are the screenshots of Alex Kidd running on my uMSX (FPGA) with the WonderTand 1.01c.


Below you will find a compilation of multiple “patches” for all the games I could find on the forum. Make sure your SSMS.INI file has the appropriate entry for the game you are executing.
[be0b1505,"Sonic The Hedgehog (UEB).sms"]
 /PB0 /FD0 /FE0
 /PR9=`3E0FD3FECD80BE3E02D3FEC38B02` /PR4EF=`00CD80FF`
 /PR3FE80=`1180FF218CBE010900EDB0C9F57BD3FD7AD3FEF1C9`
 /IPC716-3FE7F /IPC1B3-C1B5

[11a18f9c,"Streets of Rage (E).sms"]
 /PB0 /FD0 /FE0
 /PR271=`0000`

[e3cf71c8,"Altered Beast (UEB).sms"]
 /PB0

[11a18f9c,"Streets of Rage (E).sms"]
 /FD0 /FE0
 /PR271=`0000`

[eae8ff6f,"Streets of Rage II (EB).sms"]
 /FD0 /FE0
 /PR19F=`000000000000000000000000`

[fd4205eb,"Castle of Illusion Starring Mickey Mouse (U).sms"]
 /FD0 /FE0
 /PR6E5=`88` /PR6D9=`88`

[61de9f11,"Golden Axe (UEB).sms"]
 /FD0 /FE0
 /PR209=`89` /PR1EE=`88` /PR10DC=`88` /PR1108=`88` /PR113A=`88` /PR1188=`88`
 /PR11B5=`88` /PR187F=`88` /PR2F71=`88`

[35ed97b6,"After Burner (JUEB).sms"]
 /PR943=`89` /PR77F=`88`